I know, I know. February is almost over, but I still have a word that characterizes what has been going on this month. PREPARE! I've been preparing to start my new business with ceramics, to organize my house by cleaning out my closet, to be a better writer by taking a class online about blogging (Blog with Pip, which is great, by the way). Yes, I've been PREPARING for SPRING!!!!
I was sick with a cold for a good part of January, and I'm just now getting moving again.In Tennessee we have had a hard winter; cold temperatures and snow. Don't get me wrong, I love snow! I really do! Here's a lovely photo of our eleven pm walk in the neighborhood last week.

We had 7 inches total, which is a lot for us in the south. We are really excited if we get 2-3 inches. The next day it was in the 50's and almost completely melted. I'm sharing this to say that I love snow but I HATE COLD WEATHER, and we have had very cold temps all winter long. So.... I'm PREPARING for Spring! Bring on the daffodils, tulips, dogwoods, azaleas, lilacs, and peonies.
Some of my February preparations have included making my ceramic jewelry for taking to the Market Square Farmers' Market. Your items have to be approved, so the first step is MAKING the jewelry. Luckily, that's also the fun part. I think I mentioned I have a degree in art education and have had several classes in ceramics. In my art classroom we had a wonderful ceramics program and all of the children made a ceramic project every year. The 4th and 5th graders were taught how to use the wheel, well sort of. I had to have my hands on theirs because throwing a pot on the wheel is actually very hard. It's a wonderful medium but VERY messy. To have a studio for wheel throwing you really have to have certain considerations, like a place to get dirty with drains in the floor with special plumbing so the clay doesn't clog your pipes. The kiln has its own requirements, like electrical wiring, ventilation, and of course it must not be near anything that could catch on fire.
If you make something on the wheel it is called "throwing". I am not great at throwing.
Here's an example from someone who IS good at it. Click on the link to see pictures of someone throwing a pot.
If you make something without the wheel it is called "hand built". There are three types of hand built pottery; pinch pots, coil, and slab. Here is a link to see some hand built examples. This is the way I choose to work.
In one of my posts I showed you my new kiln, Kitty. I made some jewelry pieces and loaded them in for their first firing, called the bisque fire. Different kinds of clay have to be fired to different temperatures (in the general range of 2000 degrees Fahrenheit) to permanently remove all water from the clay which makes it into bisque pottery. A pyrometric cone (seen below) is placed inside the kiln in a shutoff switch and when it gets to its temperature it begins to bend which causes the kiln to turn off. Here are some of my photos.

At that point the pieces are white and not shiny, so this is when you add color and gloss with glaze. There are SO MANY different kinds of glaze and they also must be fired at different temperatures. I chose to use colored underglazes with a coating of clear glaze for shine. I wanted to see how these looked before I took the time to finish all of the pieces, so I painted a few and did a test firing. I'm glad I didn't bother doing all of them because I am not completely happy with the results. The color is not as vivid as I had hoped for, and it appears that I needed more coats because the colors are too transparent. With my pieces being so small adding many coats would be very tedious, so I will be changing my glaze choice and method. Once I find the glaze I want, I am confident I will love them. Here are some before and after pictures of my test fired pieces. You'll notice they all look green when placed in the kiln. This is the clear glaze that will change color during the firing process.


These are the jars of underglaze and the jar of clear glaze.


It Is SUPER exciting to open the kiln and see the colors!!!!

I do have a few favorites even with the transparent colors.


Overall, I am very happy with the test firing, because I learned a lot and I am excited about making earrings, bracelets, and necklaces with these pieces. Preparation is half the battle! Now, to go get some more GLAZES!!Yipeeeeeeeeeee!!!!
Sorry about the long post, but I felt like these things really went together. As always, thanks a bunch for visiting.

I was sick with a cold for a good part of January, and I'm just now getting moving again.In Tennessee we have had a hard winter; cold temperatures and snow. Don't get me wrong, I love snow! I really do! Here's a lovely photo of our eleven pm walk in the neighborhood last week.

We had 7 inches total, which is a lot for us in the south. We are really excited if we get 2-3 inches. The next day it was in the 50's and almost completely melted. I'm sharing this to say that I love snow but I HATE COLD WEATHER, and we have had very cold temps all winter long. So.... I'm PREPARING for Spring! Bring on the daffodils, tulips, dogwoods, azaleas, lilacs, and peonies.
Some of my February preparations have included making my ceramic jewelry for taking to the Market Square Farmers' Market. Your items have to be approved, so the first step is MAKING the jewelry. Luckily, that's also the fun part. I think I mentioned I have a degree in art education and have had several classes in ceramics. In my art classroom we had a wonderful ceramics program and all of the children made a ceramic project every year. The 4th and 5th graders were taught how to use the wheel, well sort of. I had to have my hands on theirs because throwing a pot on the wheel is actually very hard. It's a wonderful medium but VERY messy. To have a studio for wheel throwing you really have to have certain considerations, like a place to get dirty with drains in the floor with special plumbing so the clay doesn't clog your pipes. The kiln has its own requirements, like electrical wiring, ventilation, and of course it must not be near anything that could catch on fire.
If you make something on the wheel it is called "throwing". I am not great at throwing.
Here's an example from someone who IS good at it. Click on the link to see pictures of someone throwing a pot.
If you make something without the wheel it is called "hand built". There are three types of hand built pottery; pinch pots, coil, and slab. Here is a link to see some hand built examples. This is the way I choose to work.
In one of my posts I showed you my new kiln, Kitty. I made some jewelry pieces and loaded them in for their first firing, called the bisque fire. Different kinds of clay have to be fired to different temperatures (in the general range of 2000 degrees Fahrenheit) to permanently remove all water from the clay which makes it into bisque pottery. A pyrometric cone (seen below) is placed inside the kiln in a shutoff switch and when it gets to its temperature it begins to bend which causes the kiln to turn off. Here are some of my photos.
 |
| pyrometric cones |
 |
| cone 04 = 2008 degrees fahrenheit |
 |
| new cone placed in an automatic shutoff switch |
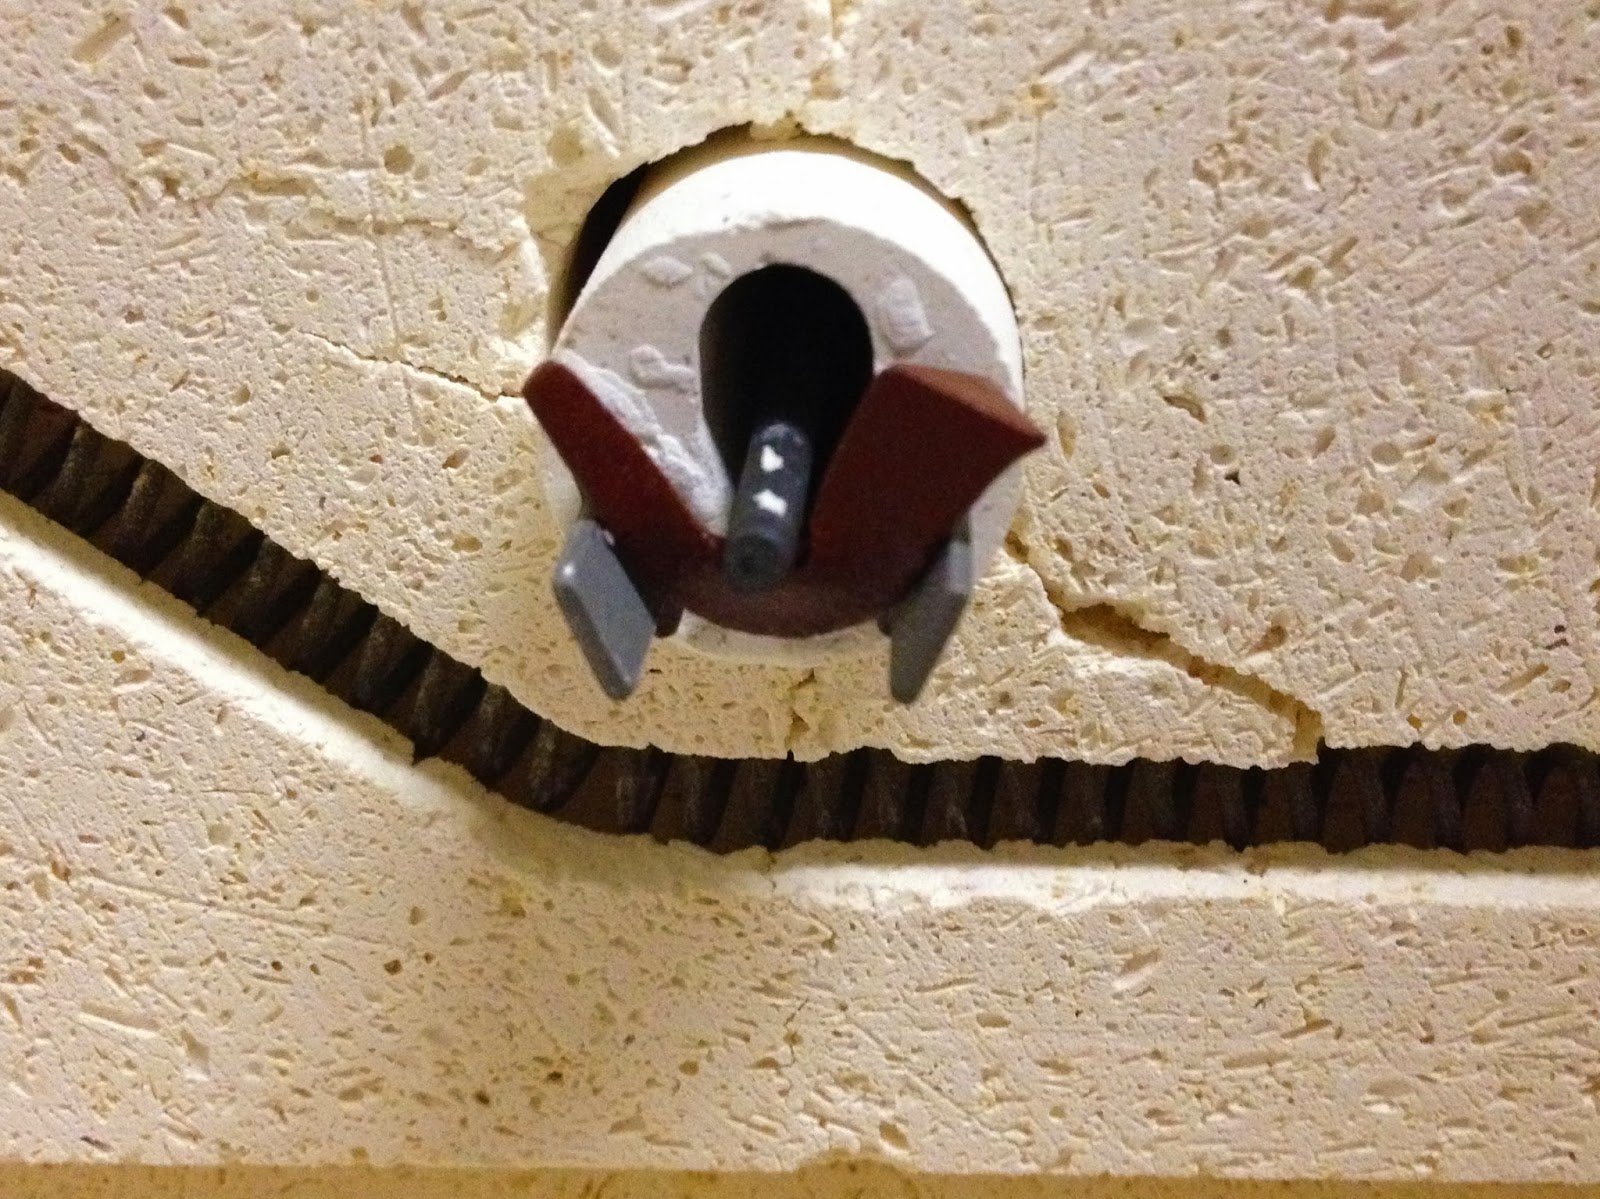 |
| A melted and bent cone after it has been fired. This drops the cutoff switch |

At that point the pieces are white and not shiny, so this is when you add color and gloss with glaze. There are SO MANY different kinds of glaze and they also must be fired at different temperatures. I chose to use colored underglazes with a coating of clear glaze for shine. I wanted to see how these looked before I took the time to finish all of the pieces, so I painted a few and did a test firing. I'm glad I didn't bother doing all of them because I am not completely happy with the results. The color is not as vivid as I had hoped for, and it appears that I needed more coats because the colors are too transparent. With my pieces being so small adding many coats would be very tedious, so I will be changing my glaze choice and method. Once I find the glaze I want, I am confident I will love them. Here are some before and after pictures of my test fired pieces. You'll notice they all look green when placed in the kiln. This is the clear glaze that will change color during the firing process.


These are the jars of underglaze and the jar of clear glaze.


It Is SUPER exciting to open the kiln and see the colors!!!!

I do have a few favorites even with the transparent colors.


Overall, I am very happy with the test firing, because I learned a lot and I am excited about making earrings, bracelets, and necklaces with these pieces. Preparation is half the battle! Now, to go get some more GLAZES!!Yipeeeeeeeeeee!!!!
Sorry about the long post, but I felt like these things really went together. As always, thanks a bunch for visiting.

Love the snow photo!! It has quite a nostalgic feel. Your explanation of the process for making your ceramic jewelry is great. I learned a thing or two!
ReplyDeleteYour ceramics colours are very spring-like. I'm getting itchy for spring too, and we haven't had nearly the winter that you have.
ReplyDeleteAs a person who knows nothing about ceramics I found it wonderful to see the process from start to lovely finish.
ReplyDeleteWow I'm a little jealous I had a kiln a maybe 10 years ago. I loved it I actually made and painted functional items dinner sets ect. I was remembering the smell of the firing this brought back some memories. thanks
ReplyDeleteLooks like the testing was successful! What a wonderful thing to do.
ReplyDeleteGorgeous firing
ReplyDelete